How to file GSTR-1 online?

This article give you complete guildeline and Basics of GSTR1 Return filling and How to file GSTR1 online. Given the step by step procedure
A. What is GSTR-1? (how to file GSTR1 online)
GSTR-1 is a return statement in which a regular dealer needs to capture all the outward supplies made during the month or a quarter. In simple words, GSTR-1 is a return in which details of sales and other outward supplies need to be captured.
While GSTR-3B is a monthly self-assessed return, you need to file GSTR-1 with outward supplies details that substantiate the liability declared in GSTR-3B.
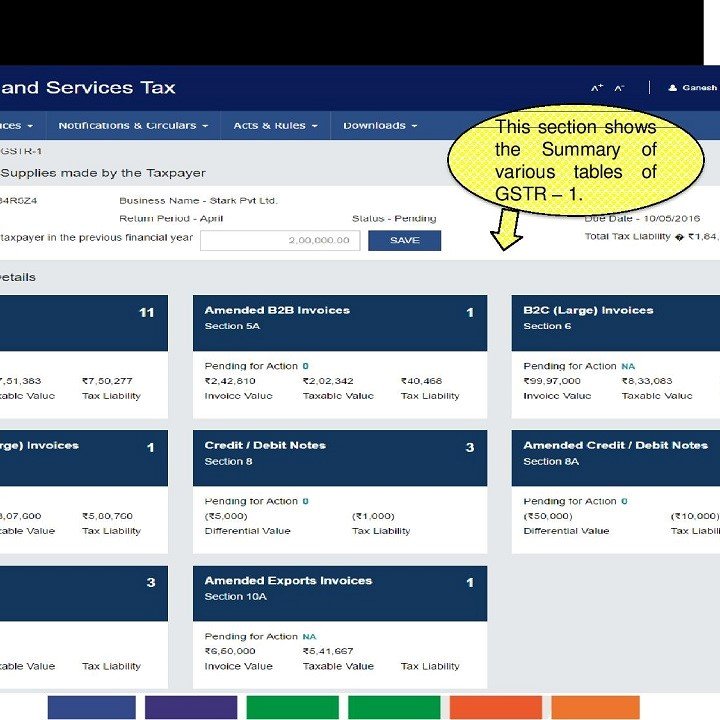
The return has a total of 13 sections.
B. When is GSTR-1 due? (how to file GSTR1 online)
The due dates for GSTR-1 are based on the turnover. Basis the business turnover, GSTR-1 returns need to be filed either on a monthly or quarterly basis.
Businesses with turnover of up to INR 1.5 crore will be allowed to file quarterly returns, other businesses with a turnover of above INR 1.5 crore must file monthly returns.
Annual Turnover up to Rs 1.5 crore can opt for quarterly filing
Quarter
Due date
Monthly GST Return (how to file GSTR1 online)
Annual Turnover of more than Rs 1.5 crore must file monthly
C. Who should file GSTR-1?
Every registered person is required to file GSTR-1 irrespective of whether there are any transactions during the month or not.
The following registered persons are exempt from filing the return:
D. How to revise GSTR-1? (how to file GSTR1 online)
Return once filed cannot be revised. If Any mistake in the return can be rectified in the next periods of (month/quarter) return. It means a mistake is made in September GSTR-1, then the rectification for the same can be made in October’s GSTR-1 also.
E. Late Fees and Penalty (how to file GSTR1 online)
Late Fees for not filing GSTR-1 is Rs. 200 per day of delay (Rs. 100 as per the CGST Act and Rs. 100 as per the SGST Act. The late fees will be charged from the date after the due date.
As per the Latest Update, the late fees have been reduced to Rs. 50 per day and Rs 20 per day (for nil return)
Step-by-step guide on how to file GSTR-1 on GST Portal :
GSTR-1 – Invoice Details (how to file GSTR1 online)
All B2B Invoice details are required to be entered inside this tile.
Step 1 – Click on the 4A, 4B, 4C, 6B, 6C – B2B Invoices tile.
Step 2 – Click on Add Invoice
Step 3 – The following details should be entered on this page –
Step 4 – You will be redirected to a page where you can see the summary of all the invoices entered. You can edit/delete invoices here (under Actions).
Step 5 – Click the BACK button to go back to the Invoices – Receiver-Wise-Summary page. You can add the invoice of a particular receiver by clicking on the receiver details and clicking on the add invoice button at the bottom of the page.
Step 6 – Click on the Back button to go back to the GSTR-1 page. You will see that the B2B Invoices tile in GSTR-1 reflects the number of invoices added along with Total Invoice value, Total taxable value, and total tax liability.
2. 5A, 5B – B2C (Large) Invoices
All outward supplies made to a consumer and the invoice value is more than Rs 2.5 lakh has to be entered in this tile.
Step 1 – Click on the 5A, 5B – B2C (Large) Invoices tile.
Step 2 – You will see a summary of the B2C (Large) Invoices. Click on Add Invoice to add a new invoice.
Step 3 – The following are the details that should be entered on this page
Step 4 – You will be redirected to a page where you can see the summary of all the invoices entered. You can edit/delete invoices here (under Actions).
Step 5 – Click on the Back button to go back to the GSTR-1 page. You will see that the B2B Invoices tile in GSTR-1 reflects the number of invoices added along with Total Invoice value, Total taxable value, and total tax liability.
3. 9B – Credit / Debit Notes (Registered)
As the heading suggests this tile is to add the Credit and Debit Note issued to registered dealers.
Step 1 – Click on the 9B – Credit / Debit Notes (Registered) tile.
Step 2 – On the summary page click on Add Details to add Credit or Debit Note.
Step 3 – In this page, the following details need to be entered
Step 4 – Click on the back button to go back to the GSTR-1 page. You will see the summary of all the debit notes/ credit notes/ refund vouchers added.
4. 9B – Credit / Debit Notes (Unregistered)
This tile is to add the Credit and Debit Note issued to unregistered dealers.
Step 1 – Click on the Credit / Debit Notes (Unregistered) tile.
Step 2 – On the summary page click on Add Details to add Credit or Debit Note.
Step 3 – The following are the details that should be entered on this page –
Step 4 – You can see the summary of all the debit notes/ credit notes/ refund vouchers issued to unregistered dealer-added here.
5. 6A – Exports Invoices
Invoices for supplies exported has to be added in this section.
Step 1 – Click on the 6A – Exports Invoices tile.
Step 2 – On the summary page click on Add Details to add an invoice for exports.
Step 3 – The following details have to be entered here –
Step 4 -Click on the back button to go back to the GSTR-1 page. You will see the summary of all the Export Invoices added.
GSTR-1 – Other Details
All supplies that are B2C and the amount is less than Rs 2.5 lakh, the details of those invoices have to be entered here.
Step 1 – Click on the 7- B2C Others tile.
Step 2 -Select E-commerce tab to add details for a transaction through E-commerce or else select Other than E-commerce tab in case transaction is through non-E-commerce. Click on the Add Details button on the bottom right.
Step 3 – The following details have to be entered here –
Step 4 -Click on the back button to go back to the GSTR-1 page. You can see the summary of B2C other invoices here.
All supplies made which attract the nill rate of GST should be entered in this tile.
Step 1 – Click on the 8A, 8B, 8C, 8D – Nil Rated Supplies tile
Step 2 -Click on edit to make the fields editable.
Step 3 – Now enter Nil Rated Supplies, Exempted (Other than Nil rated/non-GST supply), and Non-GST Supplies Amount for the following category –
Step 4 – Click on save and a success message will be displayed on top.
Step 5 -Click on the back button to go back to the GSTR-1 page. You can see the summary of all nil rated supplies made.
3. 11A(1), 11A(2) – Tax Liability (Advances Received)
All the supplies for which advances were received from the receiver of supplies but the invoice was not raised will be entered here.
Step 1 – Click on the 11A(1), 11A(2) – Tax Liability (Advances Received) tile
Step 2 -Click on Add Details button on the bottom right.
Step 3 – The following details are required to be entered on this page –
Step 4 -Click on the back button to go back to the GSTR-1 page. You can see the summary of the adjustment of advances.
4. 11B(1), 11B(2) – Adjustment of Advances
Details of all the invoices raised in the month for which return is being filed but the advance was received and tax was already paid in the previous months has to be entered here
Step 1 – Click on the 11B(1), 11B(2) – Adjustment of Advances tile
Step 2 – Click on Add Details button on the bottom right.
Step 3 – The following details have to be entered here –
Step 4 – Click on the back button to go back to the GSTR-1 page. Here you can see the summary of adjustment of advances.
The GSTR-1 return requires a dealer to provide an HSN-wise summary of outward supplies and rate wise along with quantitative details.
Step 1 – Click the HSN-wise summary of outward supplies tile.
Step 2 – Click on Add Details button on the bottom right.
Step 3 – The following are the details to be provided on this page –
Step 4 – Click on the back button to go back to the GSTR-1 page. Here you can see the summary of HSN-wise outward supplies.
Every taxpayer is required to provide details of the total document issued during a month.
Step 1 – Click on the tile Documents Issued
Step 2 – Click on Add Document
Step 3 – There are will be 12 categories of documents. Enter the serial no. of invoice issued, Total number of invoices issued and canceled invoices in respective fields. The net invoices field will be auto-populated.
Step 4 – Click on save once all the documents details are entered.
Final Step
Once all the details have been entered the return needs a declaration and can be submitted online.
Register today at Empower ERP for your accounting and GSTR return filling at our free accounting software for small business.


